
Tips to Draw the Floor Plan
Creating one’s own house is always a dream come true. But for a general people it is not possible to understand all the complex blue print of the floor plan. But it is always tough to keep patience to see the dream project in real time. Even that we don’t have any clear understanding of the floor plan. The plain 2D drawings make everything complex.
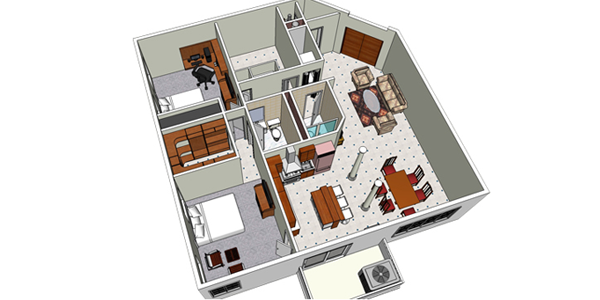
But SketchUp is the real savior in this matter. You can draw an easy 3D floor plan of your house with SketchUp which will gives you a clear understanding. Now you can have an idea about how lavish you drawing room will be, how cozy your bedroom will be and how much furnished the bathroom will be.
This is almost dream come true before you actually wake up from your sleep. SketchUp gives you an option to vividly as well as realistically view the floor plan in 3D. Here we will discuss the simple procedure to draw a floor plan on SketchUp.
- First of all open SketchUp on you computer. You will see the toolbar at the top or left of the interface. A 2D human figure will be on the screen to give you an understanding of the apparent size of your model. You may delete the model if it is unnecessary for you.
- Now select the ‘Line’ tool to draw the shape of your room. Please refer the plans of your house. Take the guidance of the three ‘Axis’ to make sure you are getting the line right where you want. Along with this also check the numeric display in the lower right corner to get the length right.
- It’s the time to select the ‘Offset’ button and create a border for the wall. Now with the help of the ‘Push/Pull’ button and click on the border of the drawing. You can raise it to the correct height for the walls referencing to the measurement of the wall.
- After giving shape now it is the time to color your model. Clicking on ‘Paint Bucket’ tool shows a dialogue box where you will find a vast palette of color and texture. Browse through the collection and choose a suitable color for your model/ after selecting the best color or texture you will just have to click on the surface to apply it. This procedure will give you a clear understanding. You may change the colors after the real time experience. Repeat the same procedure for the entire surface to get the final look.
- Now it is the time to decorate your house with furniture. Simply click on the ‘Get Model’ button to find furniture in the 3D Warehouse. Place the furniture on your room after resizing them with the ‘Scale’ tool.
- After completing the model you now save the model by selecting ‘File” and ‘Save’ button consecutively with a suitable name.

- Sponsored Plugins


- Sponsored Plugins

- Cover Story
-
 SketchUp Can Help You Win Interior..
 -
Best Laptops for SketchUp
-
How to Resize Textures and Materials..
-
Discovering SketchUp 2020
-
Line Rendering with SketchUp and VRay
-
Pushing The Boundary with architectural
-
Trimble Visiting Professionals Program
-
Diagonal Tile Planning in SketchUp
-
Highlights of some amazing 3D Printed
-
Review of a new SketchUp Guide
- Sketchup Resources
-
SKP for iphone/ipad
-
SKP for terrain modeling
-
Pool Water In Vray Sketchup
-
Rendering Optimization In Vray Sketchup
-
Background Modification In sketchup
-
Grass Making with sketchup fur plugin
-
Landscape designing in Sketchup
-
Apply styles with sketchup
-
Bedroom Making with sketchup
-
Review of Rendering Software
-
Enhancing rendering for 3d modeling
-
The combination of sketchup
-
Exterior Night Scene rendering with vray