A couple of days ago I was watching my son writing a sms on his mobile. I was impressed by the strange language he used, abbreviated words that have nothing to do with our normal way of speaking.
Whether you are new to SketchUp or a consumed user, you may want to consider an important aspect when using it. This is related to the use of shortcuts while drawing.
Learning this practice may require a little effort at the beginning since the hand moving the mouse is often faster than our brain that has to stop it and say “Hey, slow down your impulsivity and give a chance to that key on the keyboard, it works better for your needs!”
Give it a try for a drawing session and you’ll see the benefits coming sooner than you may think.
SketchUp takes care of you
You should already know that at the Google Development Center many people spend nights and days trying to make SketchUp a better place to be! This means for them giving you the ability to speed up your drawing process and, in this context, the use of shortcuts cannot be overlooked.
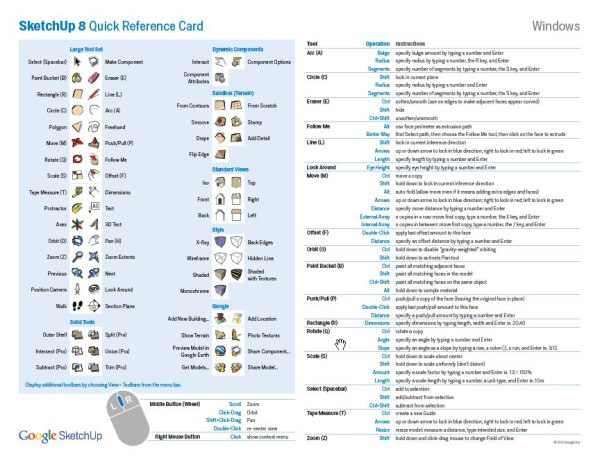
So they already assigned a certain number of shortcuts, both to the mouse and to the keyboard and published the reference card you see below
 |
Start from your mouse
An effective use of your mouse can help you to accomplish many tasks without having to select the relative function on the toolbar.
Left button of the mouse: Ok, you’re not that kind of beginner, you know that it’s used to select an object
Right button of the mouse: A little more complex, click it after selecting a particular geometry and a new world will be displayed to your eyes, it is called context menu. From here you can select a bunch of functions that will help you to reach your task. Use it as much as you can!
Middle button (wheel): Could you imagine that a little wheel on a mouse was so efficient to help you four (yes, I said four) times? Scroll it forward and backward and you will zoom in and out. Click on it and drag your mouse, you’ll orbit around your model. Press the shift key, click on the wheel and drag your mouse to use the pan tool. Double click to re-center the view. Incredible, isn’t it?
Continue on the keyboard
Look at all the keys you have on your keyboard. Imagine now that each of them could be a shortcut for your favorite tool; not only the single key, but also a combination of them. Are you more interested now?
Let’s step back a little, when I said that all the guys at the Google Development Center continuously think of us. They do, in fact, because they already assigned a certain number of shortcuts to the keyboard. They are not fixed, you can change them if you like, but how do we know what keys have already been assigned?
Here’s an example. Go on the menu bar, click on “Tools”, and you’ll see that beside some of them there’s a capital letter.
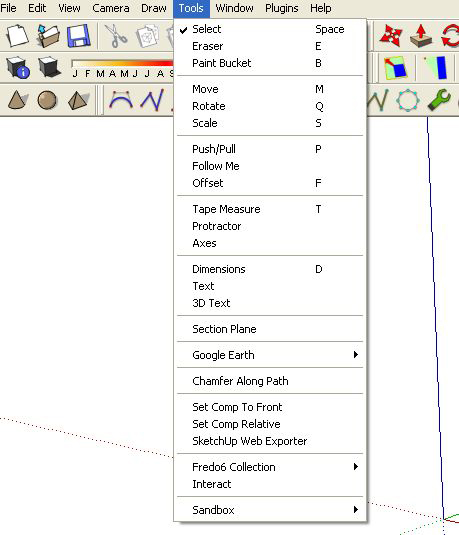 |
“E” is the shortcut key for the Eraser tool, “M” for the Move tool and so on. Remember that they are not case sensitive! I often use the Protractor tool when I draw, but there’s not a shortcut already assigned. Here’s what to do to assign it.
Select “Window” on the Menu Toolbar, go to “Preferences” and click on it. A dialog box opens, select “Shortcuts”. You see now the Shortcuts Control Panel.
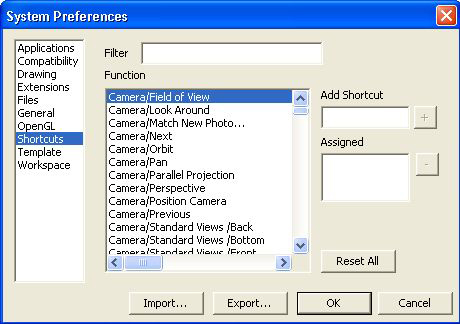 |
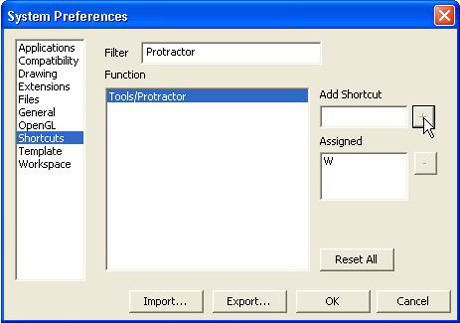
Avoid scrolling the entire list and use the filter to quickly find the Protractor tool. Hit the key you want to be your shortcut. In this case I choose “W” because in my QWERTY keyboard is close to the Rotate tool shortcut, that is “Q”.
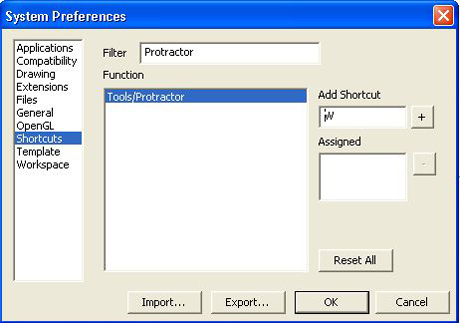 |
Click that little “+” icon on the right and you’ll shortcut will be assigned. Click on “OK” to close the dialog box.
 |
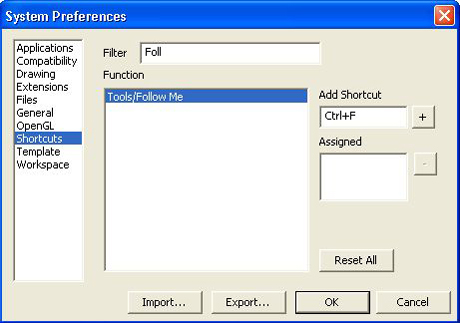
Another tool a frequently use is the Follow me tool. Unfortunately the “F” key is already assigned to the Offset tool. What can I do in this case? I can opt either for choosing a new key for the Offset tool or give the Follow me tool the same “F” key combined with Shift, Ctrl or Alt.
Select your tool from the filter, go to the “Add Shortcut” field, press (and maintain pressed!) the Ctrl key (or Shift or Alt, as you prefer) and hit the “F” key. Assign it and click ok.
 |
- Cover Story
-
 SketchUp Can Help You Win Interior..
 -
 Best Laptops for SketchUp
 -
 How to Resize Textures and Materials..
 -
 Discovering SketchUp 2020
 -
 Line Rendering with SketchUp and VRay
 -
 Pushing The Boundary with architectural
 -
 Trimble Visiting Professionals Program
 -
 Diagonal Tile Planning in SketchUp
 -
 Highlights of some amazing 3D Printed
 -
 Review of a new SketchUp Guide
- Sketchup Resources
-
 SKP for iphone/ipad
 -
 SKP for terrain modeling
 -
 Pool Water In Vray Sketchup
 -
 Rendering Optimization In Vray Sketchup
 -
 Background Modification In sketchup
 -
 Grass Making with sketchup fur plugin
 -
 Landscape designing in Sketchup
 -
 Apply styles with sketchup
 -
 Bedroom Making with sketchup
 -
 Review of Rendering Software
 -
 Enhancing rendering for 3d modeling
 -
 The combination of sketchup
 -
 Exterior Night Scene rendering with vray


