
sketchup, sketchup tutorials, sketchup tips, sketchup plugins, armedia, vray
Author : Paul Lee
SketchUp - Minecraft Export
To do this you need 3 software downloads:
- binvox & viewvox available here You can install these program files anywhere on your system.
- Obj2mc available here
- MCEdit available here
Once you have downloaded the above packages:
- Create a folder on your desktop called “Minecraft
- Put the .zip files into this folder.
- Unzip the files.
- Open the SketchUp file that you wish to export to MC. (Use a small model to start with. Nothing too complicated.)
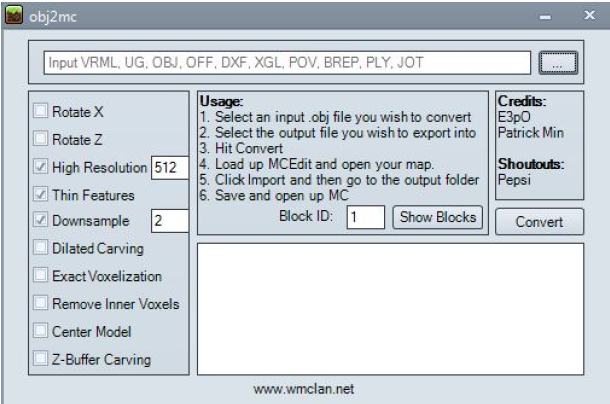
- Click on the “select” button (the 3 dots) This will open the file selection window.
- The file will be converted to a “.schematic” file.
- Open the MCedit software and import the .schematic file that you created. You can find out more about how to import, orientate and position the file using the MCedit tool here.
- When you have edited your world you can then open and play with it in Minecraft!
You must export the model as an .obj or .3ds file.... (Note: The .obj exporter is built into SketchUp Pro but if you are using the free version you need an .obj converter plugin. To get the converter you must download and install this plugin file. To find out how to install a plugin, check this instructional page.)
Open the “obj2mc” folder and doubleclick on the “obj2mc” program file
In the file selection window select “.obj” filetype for conversion. (red box below)
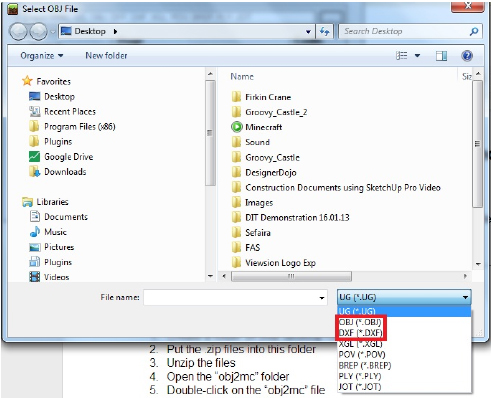
Browse to find the .obj file that you previously exported from SketchUp. Click on the required file and select “convert”
Paul Lee - paul@viewsion.ie
www.viewsion.ie
What do you think about this article

- Sponsored Plugins


- Sponsored Plugins

- Cover Story
-
 SketchUp Can Help You Win Interior..
 -
Best Laptops for SketchUp
-
How to Resize Textures and Materials..
-
Discovering SketchUp 2020
-
Line Rendering with SketchUp and VRay
-
Pushing The Boundary with architectural
-
Trimble Visiting Professionals Program
-
Diagonal Tile Planning in SketchUp
-
Highlights of some amazing 3D Printed
-
Review of a new SketchUp Guide
- Sketchup Resources
-
SKP for iphone/ipad
-
SKP for terrain modeling
-
Pool Water In Vray Sketchup
-
Rendering Optimization In Vray Sketchup
-
Background Modification In sketchup
-
Grass Making with sketchup fur plugin
-
Landscape designing in Sketchup
-
Apply styles with sketchup
-
Bedroom Making with sketchup
-
Review of Rendering Software
-
Enhancing rendering for 3d modeling
-
The combination of sketchup
-
Exterior Night Scene rendering with vray