
News
Turn Photos Into 3D Models With Autodesk 123D Catch
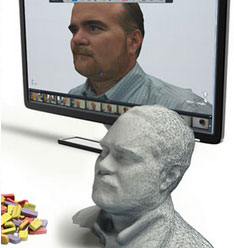
With the 3D printing revolution officially under way, the problem remains of how to get actually get a digitized 3D representation of something. You could start from scratch, using something like Google Sketchup, but I'd be lying if I told you it's easy to create anything reasonably complex. Instead, it would be great if you could just take some pictures of a real life object, then somehow auto-magically transform that into a 3D model.
Magic – meet reality – in the form of Autodesk 123D Catch
Introduction
123D Catch is just one of a range of free software from the CAD and modelling powerhouseAutodesk, and though I may take a look at the other apps at a later date, today we will be looking specifically at just 123D Catch.
The app takes a selection of photos of an object – the more the better – finds identical points and dinstinguishing features between them, and merges them all together to create a fairly accurate, realistically textured, manipulable 3D object.
Getting Started
To download, you'll need to create a free account at Autodesk. The social network buttons make this easy though. Right now, the app is Windows only, but iPad and web versions are on the way.
To learn the process, it's best to use the sample project that comes with 123D Catch. Open the app, select New Photo Scene, and select all the photos in the Program Files/Autodesk/123D Catch/sample_project/ directory.
Click Compute Scene to start the magic. The first time, a popup will ask for your name and email; the newsletter is optional though. Your images are then uploaded to remote services in the cloud (ignore the bit that says "Photofly" – this was the old service that Autodesk bought and renamed, and customizing that was overlooked). You can choose to have the service email you when your render is complete, or just sit and wait. About 20 minutes to an hour is realistic.
Note: I experienced disk access issues on Windows 7. Running the app 'as administrator' solved this.
When complete, your 3D scene will be built and opened in a basic 3D editor.
Navigating & Editing
To move around and check out the scene and model, use the group of 4 blue icons. Your mouse wheel can be used at any time to zoom and pan, but for rotation you'll need to use the 3rd icon in this group.

To crudely cut bits of the model out, use the basic selection tools and right click -> delete. This app isn't designed to be a full 3D editor of course; these tools should only be used to cut out bits of the background in the scene. For finer control, exporting the 3D model to a full modelling application is needed.

- Sponsored Plugins


- Sponsored Plugins

- Cover Story
-
 SketchUp Can Help You Win Interior..
 -
Best Laptops for SketchUp
-
How to Resize Textures and Materials..
-
Discovering SketchUp 2020
-
Line Rendering with SketchUp and VRay
-
Pushing The Boundary with architectural
-
Trimble Visiting Professionals Program
-
Diagonal Tile Planning in SketchUp
-
Highlights of some amazing 3D Printed
-
Review of a new SketchUp Guide
- Sketchup Resources
-
SKP for iphone/ipad
-
SKP for terrain modeling
-
Pool Water In Vray Sketchup
-
Rendering Optimization In Vray Sketchup
-
Background Modification In sketchup
-
Grass Making with sketchup fur plugin
-
Landscape designing in Sketchup
-
Apply styles with sketchup
-
Bedroom Making with sketchup
-
Review of Rendering Software
-
Enhancing rendering for 3d modeling
-
The combination of sketchup
-
Exterior Night Scene rendering with vray